Let it be known that the duck is my favorite meat to eat. People who don’t like duck have never had it cooked the proper way, likely resulting in a dried out, tough, yet uber-fatty, greasy, and grainy mess.
You can go to Chinatown and have Peking duck, which can be outstanding if done properly, but to cook it at home I break it into pieces. First, duck has a solid layer of delicious fat on it that will rival lard or beef suet for flavor. In my opinion it’s better than bacon fat! The breast is lean and will dry quickly, so it needs to be seared and cooked quickly, but the fat! What about that? Ah-ha, season the breast, both sides, with salt and pepper. Score the fat with a sharp knife (checkerboard pattern but don’t cut into the meat!) Place in a cold pan and place over med-low flame. Don’t touch it! As the fat melts pour it off into a container for later. When the fat has been rendered and has left behind a beautiful golden brown thin layer of crisp fat, crank the heat to high, and flip the breast over so the meat side is down. Cook to medium-rare (maybe 4 minutes), then let it rest for five minutes before slicing. Heaven.
The leg and thigh are very tough. Lots of very strong tendons that searing just will not break down. To properly cook this I prefer to prepare it “confit” (cone-fee). Confit is a French term for cooking something in its own fat. In the case of duck fat for making confit, you trim all of the fat from the carcass, trim only the excess off of the leg and thigh (attached to each other), and you keep the renderings from the duck breast. Throw all of the fat into a small but heavy duty pot with a touch of water and simmer for hours until the water has evaporated and the fat in the pot is crystal clear. Storing the finished product in the fat is also a way of preserving meat that goes back for hundreds of years. Heaven.
Duck confit has two steps: curing and cooking. The Curing Process is done equal parts of sugar and kosher salt with herbs. The mixture draws out blood and impurities while replacing it with flavor. I used 1 Cup each salt and sugar, 1 tsp each of garlic powder, caraway seeds, chives, parsley, and a ½ tsp of black pepper. Mix everything and then burry the duck legs and thighs in the mixture for 24 hours. No more! After a day rinse the leg and thighs in cold water (they will feel a little toughened and rubbery) and pat dry with a paper towel. Place in a heavy pot that is just barely large enough for them, then cover them with the rendered duck fat. I cover the pot with a layer of plastic wrap and then a layer of aluminum foil. Then I put it in the oven for about 3 hours at 200 degrees. Heaven.
There are many options to serve the duck confit. You can shred it off the bone and use the meat for upscale tacos, or on a salad, or part of a filling for ravioli. Or, you can remove the leg and thigh from the fat, scraping off as much fat as possible, and searing the meat in a pan until it crisps up. You really can’t go wrong.
Chicken Marsala for Sportsfan
This recipe is by request and I have to assume the “cook” reading this is a newbie to the kitchen. If not, sorry dude – no offense intended, I just want this to go perfectly for you. I am giving you EVERY step in detail which may make it seem intimidating, but this is a super easy recipe and will impress your lady, or whatever.
Shopping List
• Chicken breasts – boneless and skinless
• Salt and pepper
• A little flour in a bowl
• Olive oil
• Sliced mushrooms (button or cimini (“baby portobellos”)), big container, maybe 8oz
• 2 gloves garlic (smashed and pureed)
• Cooking Marsala (about 3 ounces in a glass – don’t pour out of the bottle!)
• Butter, about 2 Tablespoons
• 2 Tablespoons of flour
• 1 Quart Chicken stock (in the soup isle)
• 3 Tablespoons Fresh Parsley, chopped
Step 1
• Read Steps 2 and 3 before you do anything
* Get everything listed above ready and within reach before you start
• If the chicken breasts are a lot thicker on one side, put them in a plastic bag and pound them with a hammer (or meat tenderizer if you have one) until it is relatively uniform. Don’t pound it too thin, but you want them to cook evenly. Anything between ¼ and ¾ inch thick is good.
• Get a large sauté pan
• Get a wooden spoon
• Get a pair of tongs
• A clean plate
• A match or lighter
Step 2
• Preheat a large sauté pan over high heat with nothing in it. Don’t use “non-stick”. You want the pan to be HOT, really HOT.
• Sprinkle the chicken breasts with salt and pepper on both sides. You eat both sides so season both sides.
• Dredge them in the flour and shake off the excess. Set them aside.
• Put a few tablespoons of olive oil in the sauté pan (still on high heat) and swirl it around to cover the bottom. You want the bottom coated, but we are not deep frying here.
• Add the chicken breasts. Once they are in don’t touch them – let them sear. If you try to reposition them they will stick and tear. Let them be.
• You can lower the heat to medium high at this point.
• After a few minutes, with tongs, flip the chicken breasts over IF they are a nice rich golden brown.
• Do the same thing on the other side. If the pan gets dry, add a little oil around the edges and swirl it around with the chicken still in the pan.
• When browned on both side, and NOT cooked all the way through, pull the chicken out and set it on a clean plate.
• Add the sliced mushrooms. They will act like sponges so you may have to add a little olive oil periodically. Continue to stir them with the wooden spoon. Try to scrape up any brown bits of chicken that are stuck to the bottom of the pan. The mushrooms may “release their water”. That’s normal, continue to cook them until all of that water is cooked off and the mushrooms start to brown.
• Add the smashed garlic and keep stirring. Don’t burn the garlic. As soon as you can smell the garlic move on to the next step.
• TURN OFF THE HEAT
• Add the Marsala to the pan
• Carefully ignite the Marsala with a lighter or match. You want the flavor of the Marsala wine but not the alcohol.
• Turn the heat back to high and add the butter and 2 Tbl flour when the flame goes out. Really stir-up the bottom of the pan to work lose all the stuck stuff – all that stuff is incredible flavor for the sauce.
• The mushrooms should look kind of gloppy at this point – all good!
• Slowly add about 2 C of chicken stock while stirring to avoid lumps.
• When it comes to a boil add the chicken back into the pan and lower the heat to a simmer
• Simmer for about 10 minutes. Keep stirring and keep checking the sauce for thickness.
** Check the sauce – if it’s too thick add a little more chicken stock. If it’s too thin just reduce it a little more.
• Taste the sauce for seasoning and throw in the chopped parsley.
Step 3
Place Chicken breasts on a plate, spoon the mushrooms over the chicken. Spoon the sauce on top of and around the chicken.
Serve it with a simple mixed green salad and some steamed veggies.
• Salt and pepper
• A little flour in a bowl
• Olive oil
• Sliced mushrooms (button or cimini (“baby portobellos”)), big container, maybe 8oz
• 2 gloves garlic (smashed and pureed)
• Cooking Marsala (about 3 ounces in a glass – don’t pour out of the bottle!)
• Butter, about 2 Tablespoons
• 2 Tablespoons of flour
• 1 Quart Chicken stock (in the soup isle)
• 3 Tablespoons Fresh Parsley, chopped
* Get everything listed above ready and within reach before you start
• If the chicken breasts are a lot thicker on one side, put them in a plastic bag and pound them with a hammer (or meat tenderizer if you have one) until it is relatively uniform. Don’t pound it too thin, but you want them to cook evenly. Anything between ¼ and ¾ inch thick is good.
• Get a large sauté pan
• Get a wooden spoon
• Get a pair of tongs
• A clean plate
• A match or lighter
• Sprinkle the chicken breasts with salt and pepper on both sides. You eat both sides so season both sides.
• Dredge them in the flour and shake off the excess. Set them aside.
• Put a few tablespoons of olive oil in the sauté pan (still on high heat) and swirl it around to cover the bottom. You want the bottom coated, but we are not deep frying here.
• Add the chicken breasts. Once they are in don’t touch them – let them sear. If you try to reposition them they will stick and tear. Let them be.
• You can lower the heat to medium high at this point.
• After a few minutes, with tongs, flip the chicken breasts over IF they are a nice rich golden brown.
• Do the same thing on the other side. If the pan gets dry, add a little oil around the edges and swirl it around with the chicken still in the pan.
• When browned on both side, and NOT cooked all the way through, pull the chicken out and set it on a clean plate.
• Add the sliced mushrooms. They will act like sponges so you may have to add a little olive oil periodically. Continue to stir them with the wooden spoon. Try to scrape up any brown bits of chicken that are stuck to the bottom of the pan. The mushrooms may “release their water”. That’s normal, continue to cook them until all of that water is cooked off and the mushrooms start to brown.
• Add the smashed garlic and keep stirring. Don’t burn the garlic. As soon as you can smell the garlic move on to the next step.
• TURN OFF THE HEAT
• Add the Marsala to the pan
• Carefully ignite the Marsala with a lighter or match. You want the flavor of the Marsala wine but not the alcohol.
• Turn the heat back to high and add the butter and 2 Tbl flour when the flame goes out. Really stir-up the bottom of the pan to work lose all the stuck stuff – all that stuff is incredible flavor for the sauce.
• The mushrooms should look kind of gloppy at this point – all good!
• Slowly add about 2 C of chicken stock while stirring to avoid lumps.
• When it comes to a boil add the chicken back into the pan and lower the heat to a simmer
• Simmer for about 10 minutes. Keep stirring and keep checking the sauce for thickness.
** Check the sauce – if it’s too thick add a little more chicken stock. If it’s too thin just reduce it a little more.
• Taste the sauce for seasoning and throw in the chopped parsley.
Shrimp Etouffee

I’m a fan of good food. It doesn’t always have to be a beautifully constructed dish of 40 exotic ingredients with many polar opposite attractions. Sometimes down n’ dirty cooking, simple technique, big flavor is what is needed.
This recipe came from my friend Tarpon, NW of New Orleans. This is the family recipe handed down from generation to generation on his wife’s side. This recipe is so old I told my daughter that one of Tarpon’s relatives is actually a gator (may be true). This is exactly what the doctor ordered!
Usually this is served on a bed of rice, but Tarpon confessed that Mrs Tarpon will sometimes put the rice and etouffee in a flaky crust pie (Mad genius). Will try that next.
· 2 lbs. shrimp, peeled and deveined
· Stick butter
· 2 large onions, diced
· 2 stalks celery, diced
· 2 cloves garlic, minced
· 1 green bell pepper, diced
· 2 tsp. salt
· ¼ tsp. black pepper
· ¼ tsp. pink peppercorns, crushed
· ½ tsp. garlic powder
· ¼ tsp. onion powder
· 1 Tbl. Oregano
· 4 Tbl. Flour
· 2 C chicken stock
· 2 stalks green onion, sliced
· 8 oz fresh mushrooms, diced
· ¼ C fresh cilantro, chopped
Melt butter and slowly cook the trinity (onion, celery, and bell pepper) until the onion is translucent.
Add all of the spices and cook for 1 minute then add the shrimp.
Stir in the flour and cook for 3-5 minutes
Add the chicken stock (slowly while stirring to avoid lumps), mushroom, cilantro, and green onion
Simmer for about 10-15 minutes; just until it is thickened.
Serve in a bowl on white rice and top with all the Louisianna Hot Sauce you can handle.
Life is good.
Glazed Ham
The best tasting animal, in my opinion, is the duck. However, aside from pan roasted breast with crispy skin, foie gras, Peking from Chinatown, and confit of leg, there isn’t much. Now a pig, that’s a whole other ballgame. Endless cuts, cooking techniques, and textures. Who can argue the greatness of a ham, whether it’s boiled and sliced and served with braised shoulder, pickles, and mustard in a Panini press, or artery clogging bacony goodness? Pork is king.

This was my glazed ham from this year’s Christmas Eve dinner; a true labor of love. Here is the overview:
For the brine:
Combine everything with about a gallon of water and bring to a boil stirring to dissolve. Let cool. Place in refrigerator overnight. Add the whole ham to the pot of COLD brine. Add a little water if needed until it is fully submerged. TIP – you can add a plate or two on top of the ham to help keep it under. Cover the pot and place in the fried for 3 days. After three days, pull the ham out of the brine and use an injector to generously inject brine directly into the thickest part of the ham. Make sure to inject all along the bone. When you got everything, place the ham back in the pot, cover the pot, and return to the fridge for another 7 days.
Air Dry:
Smoke:
The Glaze (prepare the day before):
Baste the glaze onto the ham about every 10-15 minutes from 130 to 140 degrees. When the finished temp is reached pull the ham and let it rest UNMOLESTED for at least 20 minutes. Slice and bask in the glory that is ham.

This was my glazed ham from this year’s Christmas Eve dinner; a true labor of love. Here is the overview:
- Make the brine
- Cool the brine
- Brine for 3 days
- Inject brine into ham and brine again for 7 more days
- Air dry for 1 day
- Smoke
- Glaze (Prepare it the day before)
- Feast
- About a 9 lb, bone-in, fresh uncured ham (shank end if possible), with most of the fat trimmed
- 1 C dark brown sugar
- 1 C Morton Canning and Pickling Salt
- 1 oz “pink salt” (Prague Powder #1)
- 1 Tbl. Whole cloves
- 1 head garlic, sliced in half
- 1 Tbl. Black peppercorns
- 6 bay leaves
After a total of 10 days in the brine, pull the ham out and place on a clean towel, in a pan, and let it sit uncovered in the fridge for 24 hours. The purpose of this is for the skin to dry out so the smoke can better permeate the meat.
Set up your smoker for about 150 degrees. I used lump hardwood with a nice log of green apple wood for smoke. If the fat was nicely trimmed I don’t think a drip pan is needed, but a water pan may help to regulate the temp. You know your smoker (hopefully). You want to aim for a temp of 130 degrees to start basting on the glaze, and a final temperature of 140 degrees.
- ½ C Inner Beauty Hot Sauce (see proceeding entry)
- 1 Tbl. Brown sugar
- ¼ C buckwheat honey
- ¼ C orange juice
Authentic Inner Beauty

Then the dark ages came, no Inner Beauty anywhere. I scoured the Internet with a handful of dedicated fanatics for years. One day, I found an interview online with the original maker Chris Schlesinger (mad genius!). Attached to the article was a picture, snapped with a cell phone, of the original hand written recipe that was framed on the creator's wall.
Here is the original version, followed by a scaled down version.

(courtesy Chris Schlesinger, East Coast Grill)
- 5 lb scotch bonnet or habanero peppers
- 1 gallon yellow mustard
- 1/2 lb brown sugar
- 1 quart orange juice
- 1/2 gallon white vinegar
- 1 cup honey
- 1 cup molasses
- 46 oz. papaya juice
- 46 oz. pineapple juice
- 1/2 gallon peanut oil
- 6 oz. each of cumin, chili, curry, tumeric
- 2 oz. all spice
- salt and pepper
(courtesy Chris Schlesinger, from Big Flavors of the Hot Sun)
- 12 to 15 scotch bonnet or habanero peppers, roughly chopped
- 1 ripe mango, peeled, pitted and mashed
- 1 cup cheap yellow prepared mustard
- 1/4 cup packed brown sugar
- 1/4 cup white vinegar
- 1 tablespoon prepared curry powder
- 1 tablespoon ground cumin
- 1 tablespoon chili powder
- 1 cup molasses
- salt and fresh cracked black pepper to taste
Cajun Shrimp n' Grits
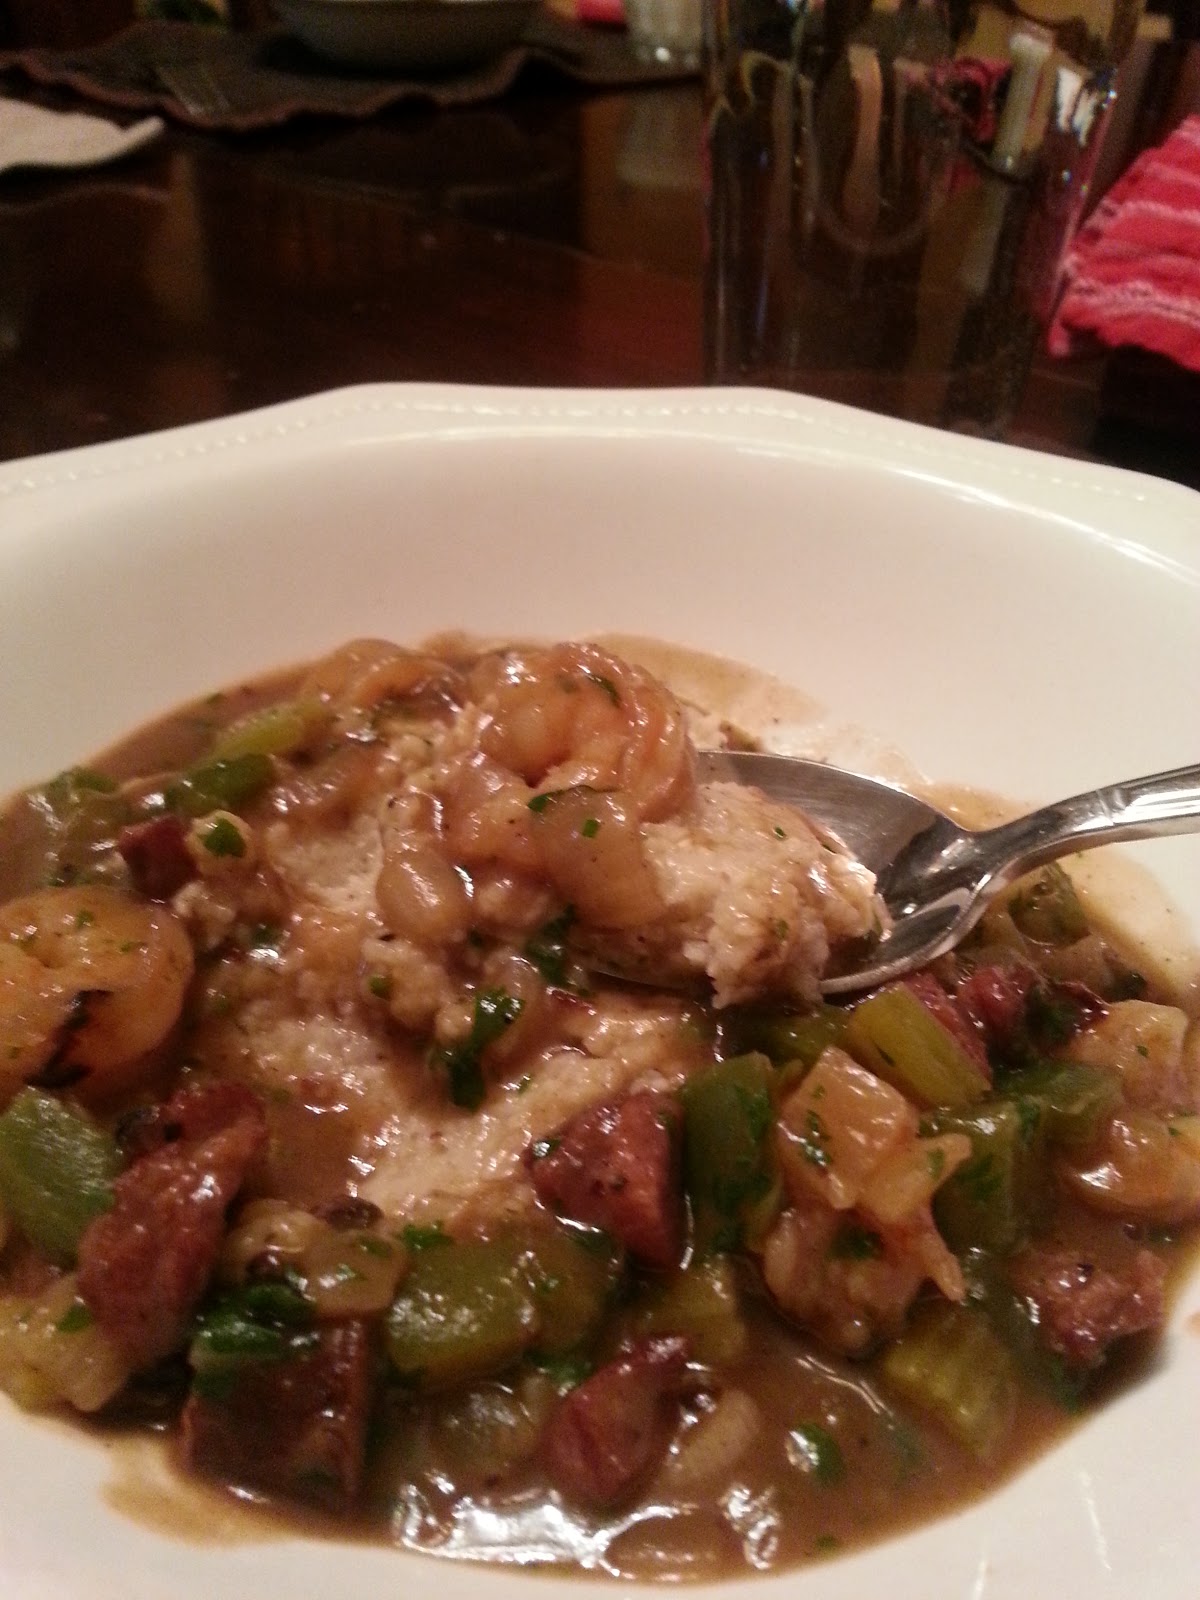
• 1 large shallots, minced
• 3 cloves garlic, minced
• 1 tsp oregano
• 2 oz white wine
• 1 C. “quick cook” white corn meal grits
• 1 ½ C chicken stock (plus a little more to adjust consistency)
• ¾ C cream
• 2 Tbl butter
• ¼ C grated parmesan cheese (to the French and Italian "purists" that say you don't add cheese to a seafood dish...get lost)
On medium heat, sweat onions in olive oil until translucent. Add garlic and stir 1 minute. Add oregano and stir 1 minute. Crank the heat, add the wine, and cook until wine is evaporated. Add cream and chicken stock and bring to a boil. Slowly whisk in the grits. Turn the flame down to a simmer, add the salt and pepper, and stir every few minutes. The grits will thicken over time. Just before serving, add the cheese and butter and adjust the thickness with more stock.
Shrimp:
• 8 oz Andouille sausage
• 1 medium onion, diced
• 3 ribs celery, diced
• 2 green bell peppers, diced
• 3 large cloves of garlic, mashed
• 2 tsp Cajun seasoning
• 1 tsp salt
• ½ tsp black pepper
• 4 Tbl butter
• ¼ C flour
• 1 Q chicken stock
• 1 lb. small cleaned shrimp
• ½ C parsley, chopped
• Cayenne pepper, or hot sauce to taste
In a heavy bottom pot, BURN the Andouille on all sides, in olive oil then remove. Sauté the onion, celery, and bell pepper (holy trinity) then remove. Chop the Andouille into small pieces. Melt the butter then add the flour. Stir constantly with a wooden spoon over medium heat until the roux is medium brown. Add the garlic, salt, pepper, and Cajun seasoning and stir for one minute. Add the chopped Andouille and trinity and stir until everything is coated with the roux. Slowly add the chicken stock while stirring to avoid lumps. Bring to a boil. Reduce heat and simmer for 10 minutes. Add the shrimp and simmer just until the shrimp is cooked (3-4 minutes). Add the parsley, adjust seasoning, and add more chicken stock if it is too thick.
To Serve: Spoon a pile of the Grits in the center of a bowl. Ladle the shrimp around the grits. Enjoy.
French Fries

Not much is better than the classic French fry; fluffy on the inside, crisp on the outside, and just the right amount of salt. Sure, you can go to McDonalds for a very good fry, but nothing will beat homemade if it is done properly, and it doesn’t take long at all.
Keys to the perfect fry:
- The cooking vessel – a deep fryer or deep pot, preferably cast iron to retain the heat.
- Frying medium – peanut oil or lard, or a blend of the two.
- The spud – Idaho. Lots of starch, low moisture, and just enough natural sugars to get golden brown.
- Proper blanching
- Correct size batches
- Salt – kosher. No substitutions
The secrets – see the last sentence
If you do not have deep fryer use a heavy pot. A heavy cast iron pot will distribute the heat evenly and help to maintain the temperature when cold potatoes are added.
Use peanut oil for its high smoking point. For better flavor use lard (remember when McDonalds used lard?) To compromise between cholesterol and flavor you can blend the two in equal proportions. Do not overfill the pot as doing so will cause splattering, burns, a possible fire, and a huge mess. Usually no more than half full is good.
When cutting the potatoes leave the skin on. It adds flavor and texture. You should wash and scrub the potatoes to get the dirt off, but make sure to dry them thoroughly.Cut the fires all uniformly (same width and thickness). Doing so will ensure that they cook evenly.
Work in small batches. Adding too many fries into the basket will cause a rapid drop in the oil’s temperature which will lead to oil absorption and a soggy fry.
Start with your fry oil at 325 degrees. At this temperature we only want to cook the potato, to soften it. When a batch of fries is flexible (not falling apart) remove them from the oil, shake off the excess grease, and spread them out on a layer or two of paper towels on a sheet pan. When all batches have been properly blanched and cooled to room temperature, turn up the heat on the fryer to reach 375 degrees.
Again, working in small batches, cook the blanched fries until they are golden brown. Cooking the fries a second time at a higher temperature will cause the inside of the potato to get fluffy on the inside while crisping the outside quickly. Remember sugar will caramelize at 320 degrees; using a higher temperature will get the desired color results quickly. When the batch is done drain it and put on an unlined (no paper towel) sheet pan and sprinkle with kosher salt. Keep in a warm oven while working the other batches.
When finished they will be the best fries ever. To take it to a new level consider doing one of the following:
Sprinkle with grated parmesan cheese
A light sprinkle of granulated garlic
a light drizzle of clarified duck fat (my favorite)
Subscribe to:
Comments (Atom)